Introduction
Installing Ecopro fibre cement planks on walls offers a durable, moisture-resistant, and visually appealing finish. These planks come in beautiful wooden grain textures and are available in three stunning color options: Walnut, Dark Chocolate, and Red Oak. This guide will walk you through the tools, materials, and steps required to successfully install Ecopro fibre cement planks on both interior and exterior walls.
- Tools and Materials Needed
Before starting the installation, gather the following tools and materials:
- EcoPro Fibre cement planks
- Measuring tape
- Electric Circular saw with a carbide-tipped blade
- Power drill and screws
- Galvanized nails (for wood framing) or self-tapping screws (for metal framing)
- Caulking gun and exterior-grade caulk
- Weather-resistant barrier (house wrap)
- Flashing tape or metal flashing
- Safety gear: gloves, safety glasses, and a dust mask
Sizes Available
- These boards are available in following sizes
- 2440mmX1220mmX8mm,
- 2440mmX190mmX8mm and
- 2440mmX150mmX8mm
- Preparing the Wall Surface
Proper preparation of the wall surface is crucial for a successful installation:
- Clean the Surface:
Before installing fibre cement planks, ensure the wall surface is smooth, clean, and free of any debris.
- Install Furring Strips (if necessary)
For uneven or non-structural walls (e.g., walls made of bricks, blocks, or concrete), you may need to install furring strips. Attach these vertical strips (usually 16 inches apart) securely to the wall. This will provide a solid and level surface for attaching the planks.
- Measure and cut the planks
Measure the height and width of the wall to determine how many planks you’ll need. Mark the cuts on the planks using a pencil and straightedge. Use a circular saw with a carbide-tipped blade to cut the planks to size.
INSTALLATION
- Vertical Support: Set vertical supports at 610mm center-to-center (c/c) spacing.
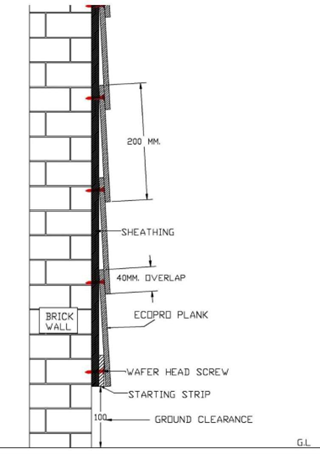
- Starting Strip: Install the starting strip above the bottom of the first row to ensure the correct angle for the plank siding.
- Fixing the First Plank: Place the first designer plank at the bottom of the frame. Secure it with 25mm self-drilling tapping screws into the vertical supports. Position the screws 15mm away from the plank edges.
- Marking the Line:Mark a guideline 20mm away from the top edge of the first row of planks.
- Fixing the Second Plank:
Place the second plank’s bottom edge along the marked line. Secure the plank to the vertical supports at the top edge only, leaving the overlap portion unscrewed for flexibility. Thus, the screw of plank of first row will get hidden under the plank of second row.
- Repeat this process row by row till end

Groove Design Installation for Designer Planks:
- Vertical Support Spacing: Ensure vertical supports are placed 610mm center-to-center (c/c).
- Attach Ecopro Board: Secure a 6mm thick Ecopro board to the vertical supports with 25mm self-drilling tapping screws, spaced 200mm c/c.
- Positioning the Designer Plank:
- Place the first designer plank over the plain Ecopro board at the bottom.
- Fix the plank to the vertical support through the plain board using 25mm self-drilling tapping screws.
- Keep the screws 15mm away from the plank edges, using two screws per support for each plank.
- Fixing the Planks: Mark the desired gaps between the planks and secure the remaining designer planks in place using 25mm self-drilling tapping screws.

Conclusion
Installing fibre cement planks on walls is a practical way to enhance your home’s durability and appearance. By following this detailed guide, you can achieve a professional-grade installation that will protect and beautify your home for years to come. Remember to use the right tools, follow safety guidelines, and take your time to ensure each plank is installed correctly.


